
Auric Network AUSCM Rank #4918
Contracts
Projects
There is no doubt one of the world’s leading trading platforms today is Binance.
Understanding how to purchase Auric Network (AUSCM) is vital if you need to start out operating on that platform.
For this reason, in this post we’ll provide you with all the information you need to buy Auric Network (AUSCM) on the Binance cryptocurrency exchange.
There’s only way to start trading on the Binance platform: registering to it.
Registering on the Binance platform is quite simple: see the following instructions.
Search for the "Register" option in the Binance main page and click on it to start the registration process.
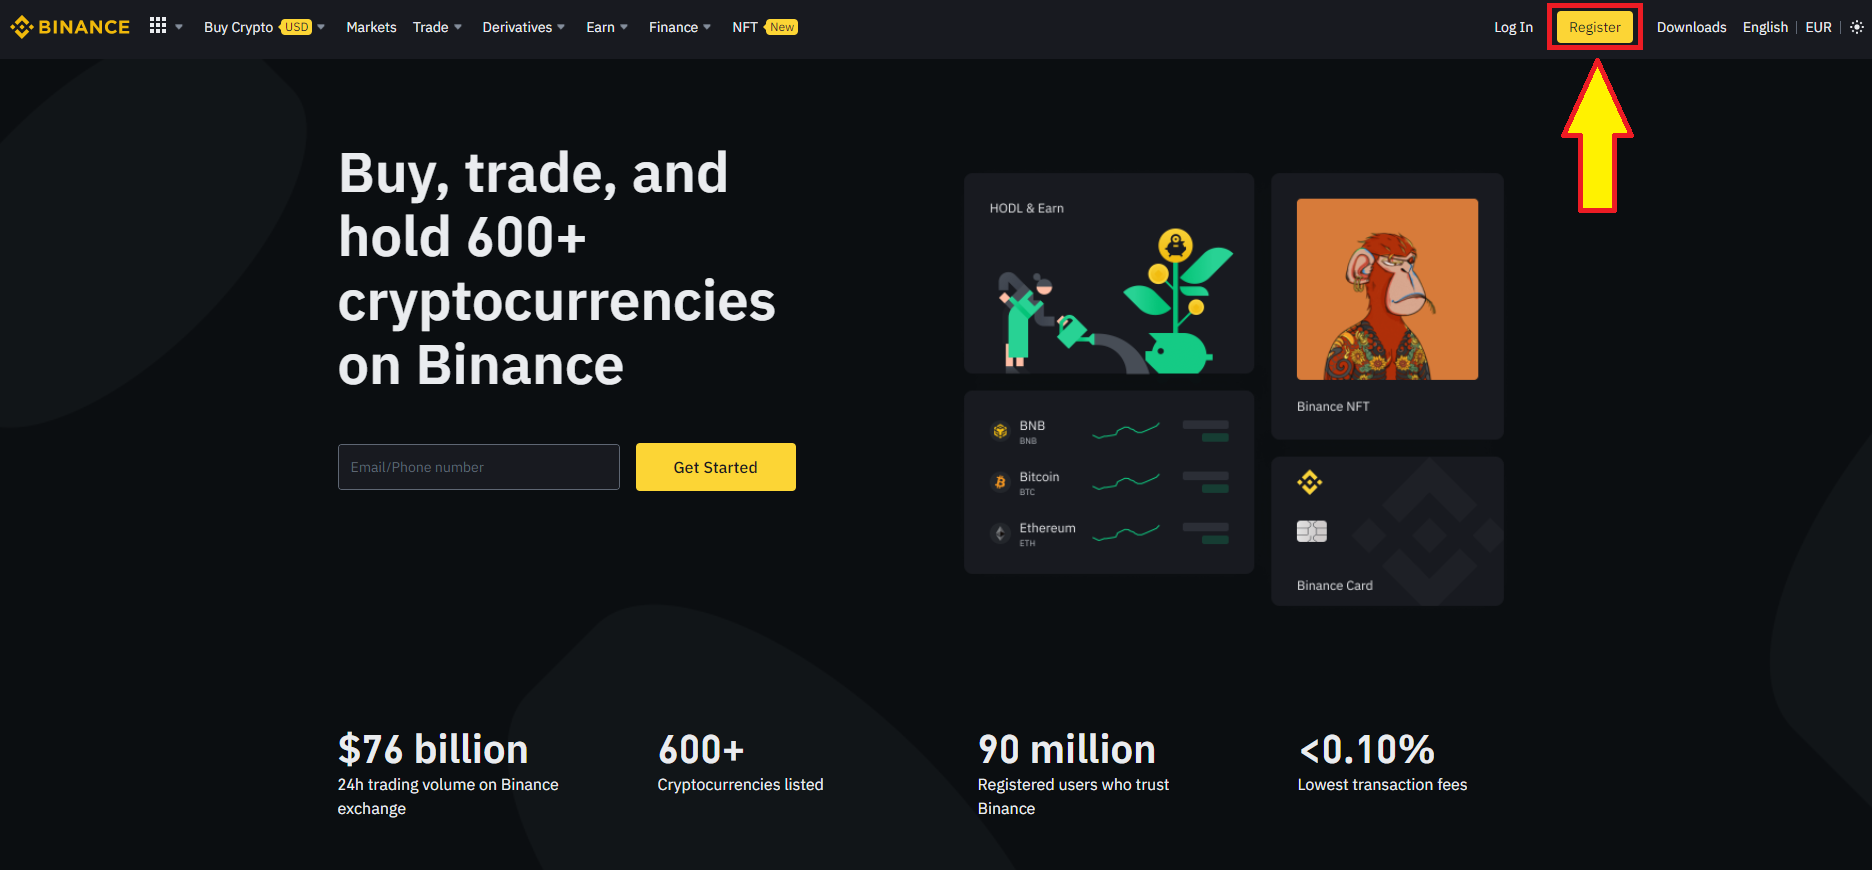
Go directly to Binance by clicking here.
In the Binance homepage you’ll see a button labeled "Register with a phone or email". Press it.

Apple tablets or mobile phones can be used as well.
In this article you’ll will see the registration process using an email address.

You should have received an email in the address you’ve just used for registering on the Binance platform. In its text you’ll find an activation password you’ll have to will enter in that page. Then press "Send"
You’re now a Binance user!.
Take a time to get acquainted to the different options of the Binance platform by navigating through them.
That’s the best way to realize how friendly the Binance platform is, and how fast you can start trading Auric Network (AUSCM).
The ID checking is a mandatory step you need to fulfill to gain access to all those options.
It is very important to note that unless you fulfill this safety step, you’ll not get permission to start trading Auric Network (AUSCM).
No big deal, though. See the next paragraphs to complete that step.
To be an authorized Binance trader you must follow the steps described below:
Pick "Security" from the drop-down list under the user profile area
You may also click the "Verify" button at the top of the screen

In the list displayed on the left-hand area of the navigator window, pick the "Identification" option.
Here you must select your country of residence.
Now, the 3 verification levels:

To begin, you should choose "Verified", pressing the "Start now" button below that label.
Then a pop-up window will be shown and there you will need to tytpe the following information:
Now you’ll have to to show a legal document to check your identity.
ID card, passport or even a driver’s license will be enough to complete this requirement.
Now, you will be asked to take a selfie, according to the platform’s guidelines.
Now you’ll have to wait for a short time while an account confirmation process takes place.
As soon as your application has been accepted, you’ll be informed via email, just be patient.
Congrats! Once you’ve received the confirmation you’re officially licensed to buy Auric Network (AUSCM). The following guidelines will be helpful.
Learning how to buy a Auric Network (AUSCM) is not that hard.
The next step is to check your identity using a legal document.
Use your passport, ID card or even your license to complete this step.
Follow the system requirements to take a selfie.
When you have completed the system’s guidelines, you’ll have to wait a short while for the confirmation to be applied to your account.
When your profile has been approved, you’ll be notified via e-mail, just be patient.
Congrats! As soon as you’ve received the confirmation you’re officially enabled to trade Auric Network (AUSCM). See the guidelines that follow.
In this segment you’ll realize how easy is to invest your money in Auric Network (AUSCM).
You may have different options throughout the process
Use the "Buy cryptos" menu on the Binance main page to know which alternatives you have when making a purchase.

Needless to say you must login to your account to do this
Placing your mouse pointer over this key will display a list of alternatives for making your purchase.
Next, you’ll need to use a legal document to sustain your identity.
You can do this with your ID card, passport, or driver’s license.
Now, you will be asked to take a selfie, following the platform’s instructions.
Now you will have to wait for a short time while an account verification process takes place.
Now you have to wait until your request has been approved. Be patient, the platform will let you know via email.
Upon receiving that email it’s time to buy Auric Network (AUSCM), to do so see the instructions below.
In this section you’ll learn how simple is to buy a Auric Network (AUSCM).
Some processes may have alternative paths
Browse through the "Buy cryptos" menu on the Binance homepage to find out which alternatives you have when buying.
Needless to say you must be logged into your account to do this
Placing your mouse pointer over this button will show a list of alternatives to make the purchase.
Choose the credit card-related option from the "Buy Cryptos" drop-down list.
These guidelines will help you in the process:
Currency preferred and how much you will invest should be defined here.

The the Auric Network (AUSCM) you would like to purchase must be chosen from the second field
Taking into account the amount of USD you’ve previously indicated, the platform will immediately show you the quantity of Auric Network (AUSCM) you are going to get.
These directions will help you in the process:
In the next box, choose the currency you want to use and type how much you want to invest.
In the second field you must pick the Auric Network (AUSCM) you intend to get
The quantity of Auric Network (AUSCM) you will get will depend upon the amount of USD you’ve recently specified. The Binance platform will automatically display it.
Next click "Continue".
In case you’re going to pay with a credit card, choose in the "Visa/Mastercard" field the button "Add card".

Then the system will ask you to type your card details.
The next field is intended to state the address associated to the card. Type it exactly as it is, then select "Add card".
When you see your new card has been added, press "Continue".
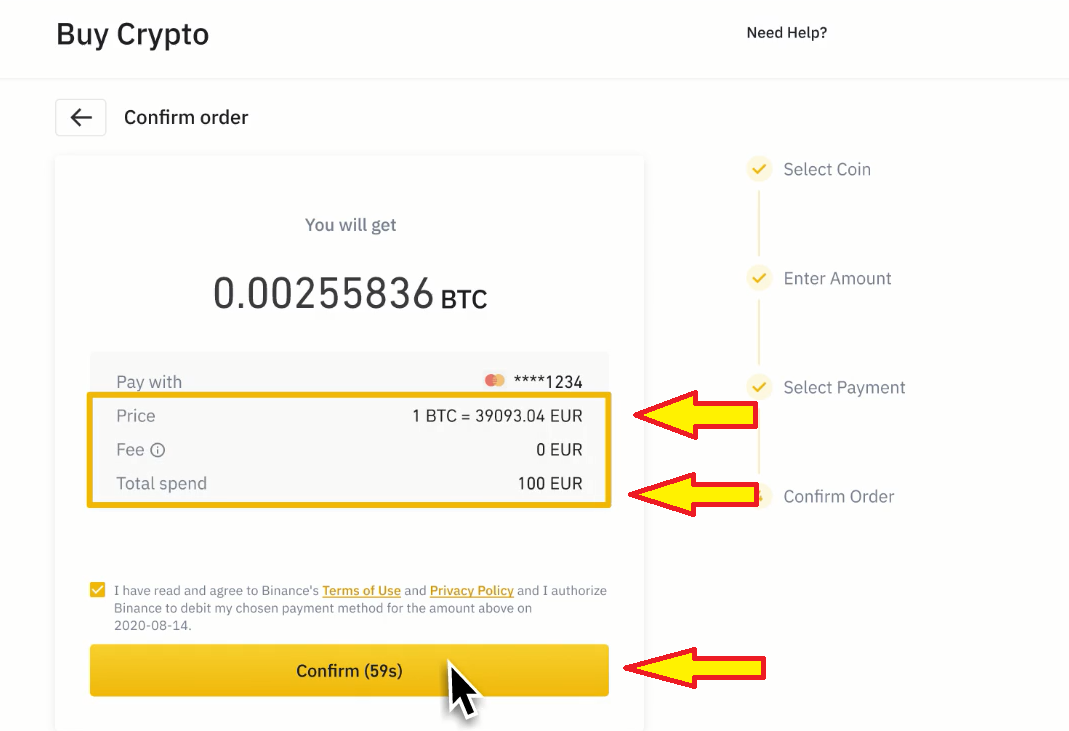
Next, all the relevant details of the transaction will be displayed: the amount to be charged on your credit card and the corresponding currency, and of course, the cryptos you are going to receive.
It will also let you know the commission you will have to pay for the purchase.
In less than 1 minute press "Confirm", there after the order will expire automatically.
The platform will now reroute you to the credit card issuing bank. Follow the guidelines in the same way you would pay with your credit card.
You can check your Binance digital wallet (called the «Spot Wallet») when the banking process is complete and you’ll find your recently purchased Auric Network (AUSCM) already there
Next, all the relevant details of the transaction will be presented: the sum you’ll pay and the corresponding currency, and of course, the cryptos you will receive.
Certainly, Binance will charge you a small amount as a commission for supporting the operation, and that will be shown in that quick view as well.
In less than 1 minute click on "Confirm", there after the order will be automatically shut down.
The Binance system will now reroute you to the bank issuing the credit card. Proceed just as you usually do when making a normal online credit card payment.
You can take a look at your Binance digital wallet (called the «Spot Wallet») after the banking procedure has been finished and you’ll find your recently purchased Auric Network (AUSCM) already there

After the new method of payment has been included in your account, look for the "Buy Crypto" menu on the upper part of the display, press on the "Trading P2P" button and follow the directions described below:
The trader, upon confirming payment reception, will immediately release the Auric Network (AUSCM).
The default place where Auric Network (AUSCM) are deposited is your Binance wallet.
Take into account that your Auric Network (AUSCM) must be in your Spot Wallet in case you want to buy others, so you will need to send them there before.
That’s easy: just press "Transfer to Spot Wallet" right after the purchase order is completed.
In case you didn’t do this, don’t get worried, you can do it at any other moment.
Cryptos will be released by the seller as soon as payment reception validation has been done.
The place where Auric Network (AUSCM) are transferred to is your Binance wallet.
Take into account that your Auric Network (AUSCM) must be in your Spot Wallet in case you would want to purchase others, so you will need to move them there before.
That’s easy: just press "Transfer to Spot Wallet" once the purchase order is completed.
In case you didn’t follow this step, don’t worry, you can do it later.

With these money already in your Spot Wallet, don’t fear to trade any crypto you think will be profitable.

Purchase any crypto from Binance just following the instructions described next:
With these funds already in your Spot Wallet, nothing keeps you from trading any cryptocurrency you think could yield the highest profit.
Discover how easy is to buy any cryptocurrency from Binance:
This post have surely pictured you a detailed vision of what Binance is and how you can trade Auric Network (AUSCM) on it.
The future of money trading relies on Auric Network (AUSCM)., and Binance is a secure and friendly environment to do business. Begin today!
If you like to make money through cryptocurrencies, you would have to be able to utilize the Kucoin platform. This exchange is yielding strong benefits for all its subscribers, in fact it is making increasingly more evolution in all its operations.
If you want to learn very easily how to buy a Auric Network (AUSCM) in Kucoin, you will need to stay in this article.


Once you’ve created your account into the Kucoin platform and fulfilled the safety requirements, you need to deposit your currency. Using this method is fairly easy, the best part is that there are several options to accomplish that.
One of them is to enter to the «Assets» or «Balance» section at the top right in the screen and select the "Deposit" link. After that, pick the Auric Network (AUSCM) you wish to transfer into your account to purchase new cryptos, for example, USDT.
Following this, you will find the network you will use for completing the transaction. We all suggest Tron (TRC20) for it retains the lowest commissions.
Next is the the address you need to put in the «Exchange» where you have the USDT you’d like to convert to Kucoin. When you do this, you will obtain the funds in the main account immediately.
If that does not work in the country you’re currently living, you should try moving funds to your account via P2P trading. This type of purchase signifies that you actually make a bank transfer to one of the documented traders to get any of the genuine cryptos.
When you get the money in your account, it’s time for you to learn how to interact with the Kucoin platform.
Before buying a Auric Network (AUSCM) on Kucoin you must move the money you’ve just purchased to the trading account. To accomplish this you have to navigate to the "Balance" menu, click the main account, enter your cryptocurrencies and then choose «Transfer». This last option can be located on the same line as the currency you are about to use to complete the purchase.
If that seems not to be not working in the country you’re living, you could attempt transferring funds to your account via P2P trading. This kind of transaction implies that you make a standard bank transfer to one of the documented traders to get any of the genuine cryptos.
When you have the funds in your account, it’s time to learn how to navigate through the Kucoin platform.
Before buying a Auric Network (AUSCM) on Kucoin you must send the money you’ve just purchased to the trading account. To achieve this you need to go to the «Balance» menu, click the main account, enter your cryptocurrencies and choose "Transfer". This last button can be found on the same line than the currency you will use for the purchase.


Following this, you will be redirected to a window for choosing where you wish to send the funds. You must take from the "Main Account" to the "Trading Account", and indicate the currency and the sum you want to send to trade. Then visit "Confirm".

Once you have the cash already credited in your account, you can buy your crypto and start trading.
Now you will learn how to buy Auric Network (AUSCM) in diverse ways. To start, you need to open the «Trade» menu and choose "Spot trading" (Spot Market). Then simply enter the word Auric Network (AUSCM) in the search box at the top corner of the webpage.
The platform will indicate the crypto pairs you are able to trade with.

In other words, you will only be in a position to purchase Auric Network (AUSCM) just with the crypto pairs showed there.
With this case, you can do it with «USDT», «USDC», «KCS», and «BTC».
We select ADA/USDT because we’ve got funds in this pair. When we do this, it quickly loads the crypto information and the order book containing the buy and sell operations.
For being able to complete the transaction, you ought to enter the trading password.

At the bottom-right, the financial markets to trade crypto can be found, enabling automatically «Spot». There we now have 3 options to purchase Auric Network (AUSCM). Next you’ll see the options:

You can also configure the order activation and process it at the optimum market price. You are going to do this by selecting «Stop Market», and indicating in "Stop Price" the sum you wish the Auric Network (AUSCM) to reach to activate the order and the amount of USDT to invest. By hitting Buy Auric Network (AUSCM), your buying order will be executed at the market rate when it is the same as the stop price you have typed.

With just one of these three options, you’ve already got the Auric Network (AUSCM) tokens you’ve just purchased available in your trading account. From now on you can operate with it or you can get other cryptos. Bear in mind that with Auric Network (AUSCM) you’ll only be capable to get the cryptos available in their pairs. Probably you will need to sell the Auric Network (AUSCM) for a crypto that is usually available in the Auric Network (AUSCM) pairs, such as BTC, USDT, and BNB, and after that you could get the particular one you actually wish.
You can now start trading a Auric Network (AUSCM) through Kucoin.
| Exchange | Market Pairs | Buy |
|---|---|---|
| Flybit | FIL/USDT | - |
| Uniswap (V2) | GAME/WETH | - |